n order to achieve the maximum service life of the joint rotating bearing without premature failure, you must pay attention to skills when installing the joint rotating bearing and keep it clean.
The joint rotating bearing should be removed from the package immediately before installation to avoid contamination. Use a clean cloth to wipe the joint rotating bearing parts that may be soiled due to improper handling or damaged packaging.
The sliding contact surface of the joint rotating bearing must be matched to ensure good friction and wear characteristics. Therefore, any change in the sliding contact surface can shorten the bearing life. The above changes also include cleaning sliding contact surfaces, or contacting them with solvents, detergents, oils, or similar media.
All related parts should be kept clean and free of any burrs. At the same time, be sure to check whether the dimensions of the relevant parts are accurate before the installation process begins.
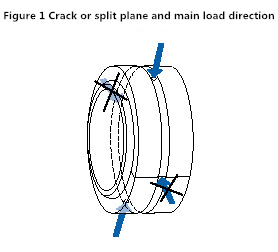
When installing a joint rotating bearing with a split outer ring or a split outer ring, pay attention to the position of the joint at 90 ° to the direction of the load (Figure 1), otherwise the service life will be shortened.
Before installation, the steel or plastic fastening straps used to fix the outer ring of the spherical plain bearing must not be removed. The fastening tape is located in the annular groove and does not protrude from the outer surface of the joint rotating bearing.
The joint rotating bearing outer ring that is axially split and fixed with bolts must be installed in this way, and the bolts must not be loosened.
installation
Use the following tools to install joint rotating bearing:
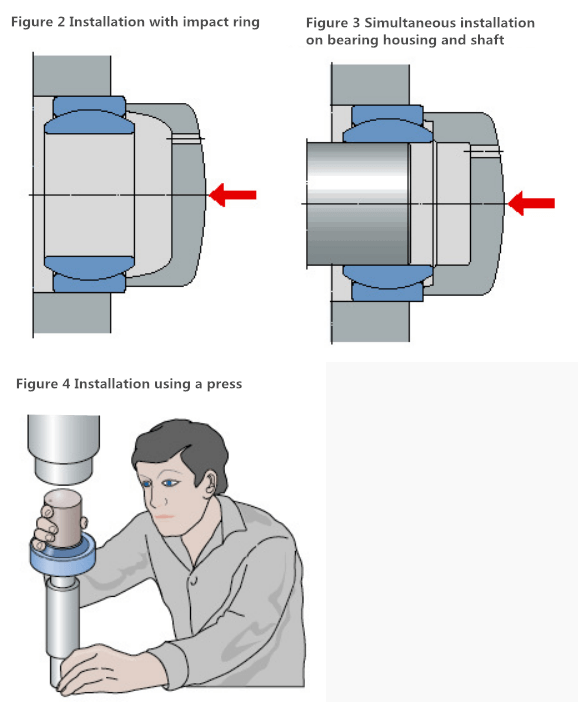
One installation of the impact ring (Figure 2) or a section of pipe; usually, the impact ring should be installed with an interference fit first
An impact ring with two shoulder surfaces (fig. 3) for mounting the bearing on the shaft and the housing at the same time
If the number of bearings is large, appropriate tools can be used in combination with the press (Figure 4)
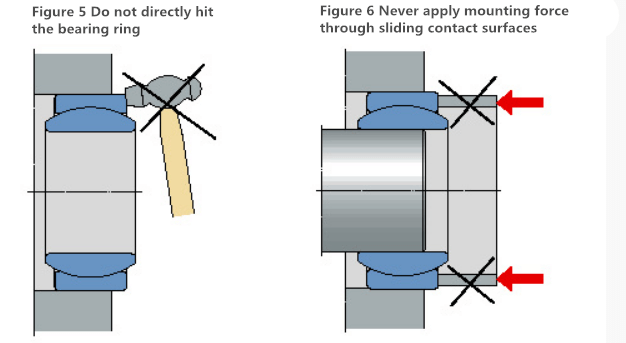
Never use a hammer or pointed punch to push the bearing into place, as either way will damage the bearing ring (Figure 5).
The sliding contact surface must never be used to transmit the installation force (Figure 6). This may damage the sliding contact surface and / or expand the split outer ring or split bearing outer ring, resulting in the need for greater installation force.
Hot installation
Under normal circumstances, it is not possible to cold install larger joint rotating bearings, because as the size increases, a much greater force is required to press the bearing into place. Therefore, the recommendations are as follows:
Before installing the joint rotating bearing on the shaft, heat it (Figure 7)
Heat the integrated housing before inserting the bearing
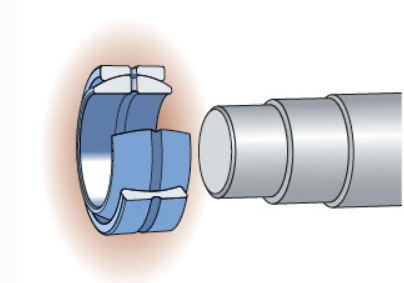
To install the joint rotating bearing on the shaft, a temperature difference of 60 to 80 ° C is usually required between the ambient temperature and the heated inner ring. For housings, the relevant temperature difference depends on the interference fit and housing diameter. However, a moderate temperature rise is usually sufficient. When heating the joint rotating bearing, do not exceed the temperature limit of any related parts such as seals.
In order to provide a uniform and risk-free heat source, induction heaters should be used. It is not recommended to install the joint rotating bearing by cooling the shaft, because the temperature required by this method is very low, which will inevitably lead to condensation, thereby causing corrosion risk.
In order to facilitate the installation of large joint rotating bearings, especially large bearings after heating, slings and hoists can be used. Metal or fabric slings can be used around the outer ring. Adding a spring between the lifting hook and the sling helps to carry the bearing.
Rod end joint bearing
The rod-end articulated shaft is equipped with pins and shafts like spherical plain bearings. Slight heating can reduce the required installation force and reduce the risk of damage to related components.
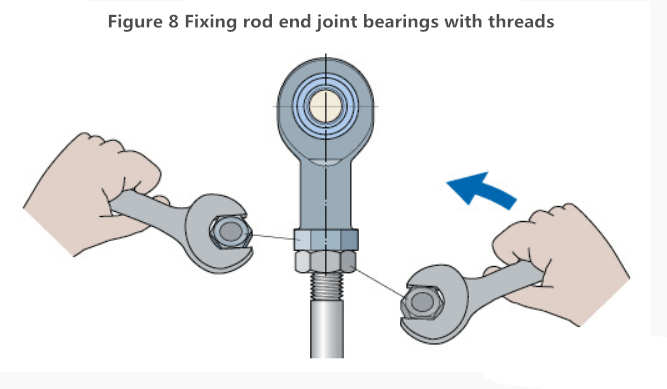
When fixing the rod end joint bearing to the threaded rod or extension tube (Figure 8), use a countersunk lock nut on the external thread of the rod or rod end joint bearing. The countersunk lock nut should be tightened against the shoulder surface of the rod end articulated bearing or tube.

